 Burr and Burton Academy
GRAPHIC DESIGN
Burr and Burton Academy
GRAPHIC DESIGN
Design Studio 2020-2021
Projects
2032 Summer Olympics
1. Olympics
Random Olympic Country Spinner
PROJECT BRIEF
OVERVIEW:
The summer Olympics exemplifies the pinnacle of human athleticism, while bringing together athletes from 206 nations to a selected country. Every four-years, a selected country is host to over
eleven-thousand competitors as they compete in 339 events in just over two-weeks. During this time, the host country's culture, creativity, technological achievements, and geographical beauty are
on display to the world through festivities, mascots, various promotional materials, and branding.
STUDENTS PROMPT:
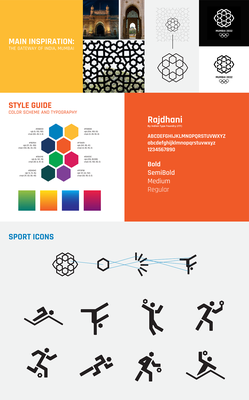
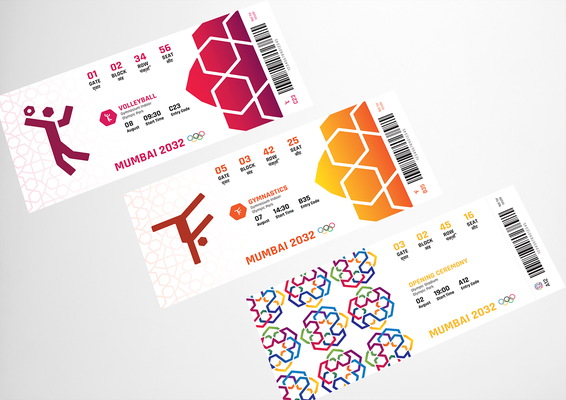
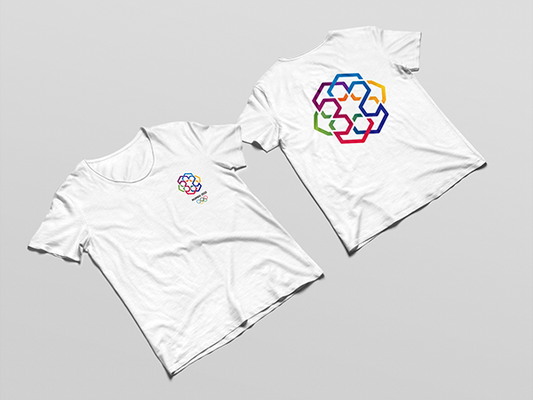
For this project, students are tasked with designing the brand elements for a 2032 Summer Olympic host city that's selected at random. The branding elements include
the Olympics: logo, icons for three assigned sports, signage, and layouts for tickets, deck pass, and apparel. (Pick two other than the LOGO)
LEARNING OBJECTIVES:
Students will thoroughly research their assigned country's culture, geography, iconography, and historical achievements that will aid in designing the brand language for their 2032 Summer Olympics. The research and style guide students develop will be stretched across various forms of medium and applications. Throughout the process, students will learn:
- Different methods of research and how to apply it to design.
- Logo design and how a mark responds to various medium, and how its approach can transfer to iconography.
- Color theory and application
- Brand Style Guides and how to present work to clients.
DELIVERABLES:
Students will fill out a Design Brief as well as completing
A Creative layout in your Portfolio that includes sections for the project's: Overview, Process, Logo and its grid structure, Color and Fonts, Sport icons, signage, and mockups for the sport tickets, deck pass, and apparel.
Important links to help you understand the concepts of iconography branding and logo design.
EXAMPLES:

Keeping on task and mindful of schedule and due dates is very important. There are a lot of parts to this project so waiting until the last minute will not work.
2. Ego:
What is Ego?
noun, plural e·gos.
The “I” or self of any person; a person as thinking, feeling, and willing, and distinguishing itself from the selves of others and from objects of its thought.
Psychoanalysis. the part of the psychic apparatus that experiences and reacts to the outside world and thus mediates between the primitive drives of the id and the demands of the social and physical environment.
egotism; conceit; self-importance: Her ego becomes more unbearable each day.
self-esteem or self-image; feelings: Your criticism wounded his ego.
Philosophy. the enduring and conscious element that knows experience.
Scholasticism. the complete person comprising both body and soul.
Ethnology. a person who serves as the central reference point in the study of organizational and kinship relationships.
You are to create an advertisement based on the concept of “Ego”.
The ad campaign needs to be original, fresh and cohesive to the concept of “Ego” and what it stands for. The product or base of the ad is up to you.
- All design concepts and planning must be done in your sketchbook and documented.
- Research more details of the concept of “Ego”, what does it mean on a deeper level and how can you use that in the creation of your advertisement
- Project perimeters:
- Advertisement must be 8.5x11 vertical format (up and down).
- All images and font choices must be sited.
- Color choices must be recorded and included in your notes or on your portfolio.
You are free to use images and text in anyway you feel is relevant to your final design. Any outside images must be sited and included in your portfolio.
3. Family Crest / Coat of Arms:
Create a Family Crest Using Adobe Illustrator.
This will require some research of your family history / heritage.
Do the best you can with this. Genealogy can take you into many different directions and can lead you back for many generations. I am not looking for you to do a full genealogical breakdown of your family history.
Where do they come from?
Ask family members if you don't know about your family history.
Maybe there is already a family crest on record. If there is, I would like this to be a redesign not a copy of the original. However, you can most definitely, take parts from the original to use in your new design.
Don’t: Copy someone else’s coat of arms or family crest.
To usurp the use of another person’s coat of arms is highly improper and is a dishonest practice. It isn’t, technically speaking, against the law to do it, but you should still avoid it.
Do: Take the time to learn the meaning behind the symbols.
The animals, plants, people, and designs that appear on a coat of arms (and also in a family crest) have specific meanings. Each color you see in a coat of arms also conveys something specific. Take the time to find out what something means before you put it into your artwork.
Don’t: Base your design around your surname.
There are many people in this world whom you share a surname with. Obviously, this does not mean you are related to all of them. Genealogists with the last name of “Smith” or “Jones” quickly discover that truth. How much meaning would a coat of arms based on your surname really have?
Instead, you can do something different. Choose an ancestor and make a family crest for them. Include elements in the design that have a meaning that relates to their accomplishments, occupation, and life. Another option is to make one for yourself.
Every Coat of Arms has its own unique traits. You do not have to follow the traditional style if you don't want to.
Keep a record of all your findings. Record the colors used and their specific meaning to the design. Record the meanings of all the symbols and design aspects you use.
You can put all this information on your portfolio or in a google doc.
Project parameters:
Design should be no smaller than 8x8in and no larger than 8.5x11in.
Take a look at a couple of these links for information on Heraldry and Family names.
Do more research than these sites, this is only a tiny amount of information.
3. Deck of Playing Cards: (more details and links can be found at the bottom of graphic design studio page on class website.)
Hierarchy and priority grouping are the main design focus of this assignment. Above all else, make the hierarchy clear and ordered through your visual system. Within the context of the entire deck of cards there is an implied priority order. Within each separate suit, there is a priority grouping as well. Certain cards appear to be worth more than others regardless of the game played with them. This relative importance should be evident by the look of the cards themselves, it should not require an explanation to make this relationship understood.
Thematic unity is a secondary focus of this assignment. Base your set of cards around a theme which can be extended through various levels of implied importance and similarity grouping. Look for similarities as well as differences among characters/roles, objects or events to draw inspiration from. Are there any "good guys" and "bad guys?"
In the West, a standard deck of cards is made up of 52 individual cards divided up into 4 suits: Spades, Hearts, Diamonds and Clubs. Each suit has 11 cards, the face cards: Ace, King, Queen, Jack and the number cards: 10, 9, 8, 7, 6, 5, 4, 3 and 2. Two Jokers can also be found and are used in some card games. However, there are some common features that all decks world wide have in common: having the same pattern on the back of each card in a deck, having suits which set up a hierarchy order; object/symbols are used to depict each suit- Spades, Heats, Diamonds, Clubs, Acorns, Rods, Coins, Swords etc. Equally varied in depiction are the subjects for the face cards. Some of the figures have come from history, others from characters in literature and still others from the imagination of the person who has designed the deck.
This is a very large task. It will take planning and sketching before you begin working on the computer.
The number cards will be easier to organize than the face cards.
Do some research as to what the standard card deck looks like and what suits and face cards are in them.
You must create the 52 playing cards, One Joker and One front/back design.
You can take this in any direction you wish however, it is to be clean, organized and professional. That does not mean you can't be creative and fun!
Use the Card Template (see Mr. Vincent) as your guide.
Check out the link for ideas and do plenty of research and brain storming.
You MUST review your ideas with me before you begin working on the computer.
Incentive; if card deck is completed well, there is a possibility to have them made into a real set of cards!
4. Cereal Box (Extra details, instructions and links can be found in Unit 10 on class site.) As well as the design packet from Mr. Vincent
This is also an extensive project.
You are to design, from scratch, all six sides of a cereal box.
This will include:
- The front side with name and artwork including a character and all other pertinent information.
- Back side must have an activity or something that will occupy a person for five minutes as well as all the other pertinent information.
- Side one must have nutritional information and ingredients. This must be done from scratch not copied from another cereal or off the internet.
- Side two must have a written paragraph of 100-120 words describing and promoting the product. See packet for details.
- Top side must have the typical information that you would see on a cereal box.
- Bottom side must have the typical information that you would see on a cereal box.
All your sketches and design ideas must be recorded as well as completing the design brief package (see Mr. Vincent)
Your final design must be created using the template provided.
A color swatch set must also be created based on the colors you use.
Cook Book Recipe Design (Family Style)
It is not unusual for our families to have "Family recipes" that have been passed down from generation to generation or ones that are just a family favorite. Many of these that are passed down are culturally connected to our ancestors.
This project will require the use of adobe Illustrator, InDesign and Photoshop.
Learning the grid layout system will be important to create the two page layout necessary to complete this project.
Requirements:
Connect to family members and learn about a family recipe that may have been shared in your family, maybe one of your favorite meals, find out where it came from, who started it, why does it have any significance to your family of family tree, where does it come from.
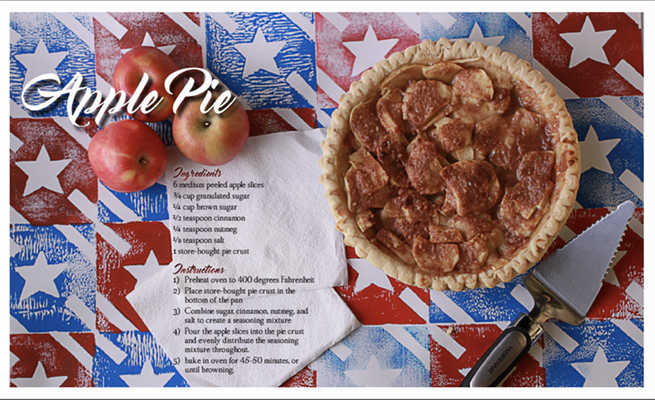
You are to make the recipe and photograph it.
If it is transportable you could use the photo studio to take the photos.
Write down the instructions and ingredients of the recipe so they can be included in your design.
Think about the theme or connection to any symbolism that the recipe may have. Colors, symbols, flag, coat of arms, etc.
You will also need to write a brief description of the origins of the recipe.
When designing the layout of the pages keep in mind the information that you need to share and how the photos and copy (text) will relate to each other. Be mindful of space/proximity, balance, alignment.
You will need to have a title (most likely the recipe name) ingredients, and written instructions as well as a brief description of the origins of the recipe.
Specifications:
17x11 (tabloid) horizontal
1/4in border


AR (Augmented Reality) Design and Art Project
This Year for the Art EXPO we would like to create AR artworks that will combine still pictures with moving images/video.
There is a company called Artivive that has a program that can combine these two elements. Once they are combine the viewer can use a device (phone, iPad, etc) to look at the image and visually see a moving element to your picture.
You can see some examples at artivive.com
The idea is to have this done for the ART EXPO at the end of the year.
You will be creating both the still image and the video component to be used in your final product.
The final AR Image should be no more than 15-30 seconds.
Written Reflection and answers to questions.