 Burr and Burton Academy
GRAPHIC DESIGN
Burr and Burton Academy
GRAPHIC DESIGN
Building Your Digital Portfolio.
ePortfolio Creation
We will be piggybacking off of the Music Department Site Builder
Read the directions below before you fill out the form.
- You will use the form below to create your ePortfolio.
- IF you already have one, try to log into it and modify it for this new class by adding the name of the course and the units. If you lost it, then you will have to create a new one, but will have to use a different email address.
- Name your portfolio - use your school user name if possible.
- Save.
- Write down your user name and password, or save it on your phone o.
- Modify the new ePortfolio to personalize it. Remove all of the directions and picture and add your own look and feel.
- Add “Course Name” on the front page.
- Use the unit links to store your work, make sure they are still showing.
- Customize the front page to reflect your own personality.
- Use the class time to learn the tool.
Good design isn't decoration, its a solution to a problem, and good designers recognize that fact. Bad design lives inside Photoshop, good design lives around the edges of a hard problem.
Good design is hard. Its fraught with constraints, conflicting opinions, and the challenges of solving a problem for a broad set of people. Yes, the process requires good taste and skills, but most of all, good design requires the soft skills that bad designers never seem to master (insight, empathy, negotiation, backbone, business savvy).
Bad designers keep throwing solutions against the wall until something sticks (or they get fired). Their solutions are derivative, "inspired" by the latest fad or successful app, rather than being based in well considered solutions.
A good designer can defend their choices/decisions with solid rationale based in the customer (or user's) need or business value.
Bad designers rely on "I went to design school, and look! That's what Apple does".
In my experience, bad designers don't listen well. They never go beyond a superficial rendering of exactly what they were asked to do.
Bad designers don't add value.
Everyone starts as a bad designer. The trick is to becoming a less bad (and eventually a good designer) is to hone your skills and craft, but focus on developing your soft skills.
The true mark of a great designer is a great listener, empathetic, humble, and interested in solving hard problems with other smart people, regardless of their background.
Design Thinking
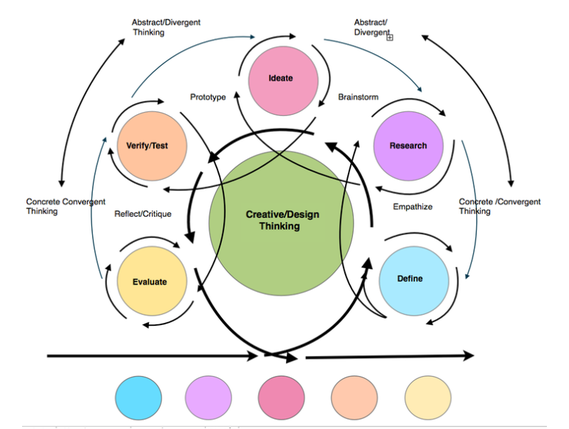
Mr. Molinellie's more complicated visualization of the design process
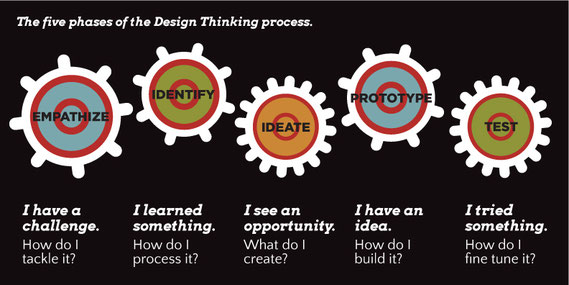
"Design Thinking", or what can also be referred to as "Creative Thinking", is a mindset, or thinking approach to solving a complex challenge or problem. This type of thinking came to prominence in the 1980's as companies began to apply a process of "human-centered" design where the needs, wants and limitations of the end users of a product were given extensive attention during each stage of the design process. As businesses began to find great success in this type of approach, a variety of variations on the design process came to be, with the core process essentially remaining true and unchanged. The process itself is rooted in the ability to understand the world and our relationship to it. Through empathy, research, brainstorming, prototyping and revision, creative solutions are found. This process encourages the development of ideas to challenges in a manner that is free from judgment, eliminating the fear of failure, and encouraging maximum input and participation from all participants.
In the Media Studio courses, the process of Design Thinking will be developed and applied within all course work. Why? Design thinking is an important thinking skill that is essential to the study of any discipline. It is a process that can be used to solve any challenge in a manner that will be effective and efficient, allowing students to freely explore their own creativity. It can be applied to learning software, designing a Logo, programming a robot or creating an animation. Several challenges will be presented in this first unit in an effort to help you become more familiar with this process. We will learn how to think first, then apply this skill to an area of concentration. We will ask you to reflect upon your thinking throughout this unit and beyond. Please keep an open mind.
Unit 1 Projects:
Step 1. Do the Marshmallow Challenge.
Step 2.Using the following questions as a guide write a reflection on the marshmallow challenge. Please use complete sentences.
- WHAT WERE THE DIFFICULTIES YOU ENCOUNTERED?
- WAS THERE GOOD COMMUNICATION IN YOUR GROUP?
- WHAT WERE THE PERSONAL DYNAMICS OF YOUR GROUP - DID ONE OR MORE PEOPLE EMERGE AS GROUP LEADERS?
- DID EVERYONE GET TO PARTICIPATE?
- WAS YOUR GROUP ULTIMATELY SUCCESSFUL IN COMPLETING THE CHALLENGE - - WHY OR WHY NOT?
- DID YOU FIND THIS CHALLENGE FUN?
- HOW WOULD YOU DO THINGS DIFFERENTLY IF YOU WERE TO DO THIS CHALLENGE AGAIN?
Project #1 (2 class periods)
What is Design / Inversion Design
Watch the following video:
Step 1 - Watch the Following Video as a class.
What is design?
Step 2 - Take notes in your sketchbook or directly in your e-portfolio and discuss as a class
A more detailed explanation of the steps of the design process.
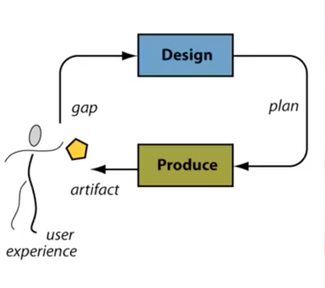
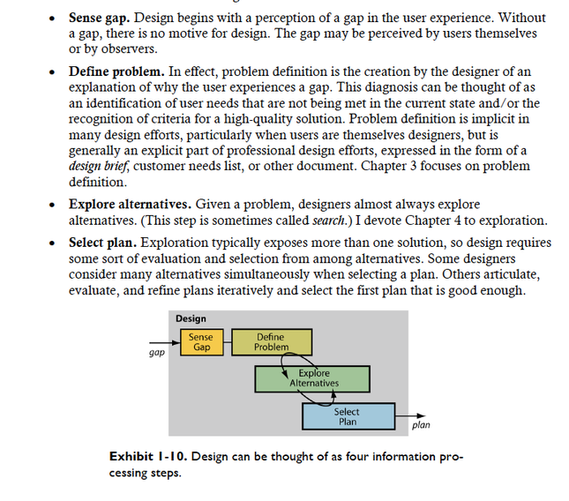
From: Ulrich
In the video you just watched, Prof Ulrich described a small design challenge that he used to illustrate some of the differences between art and design. He called it an inversion. In this design challenge you will create your own name inversion.
Check out Scott Kim's Inversion Gallery for examples!
- Your inversion must meet the following criteria:
- You must use your real name (first or last) or actual nickname.
- Your inversion must be able to be clearly read from either side. (Picture two people opposite each other with the paper between them. Each should be able to read the name).Your inversion must follow the model in the video (study the photo above for reference)
Your project must use ALL of the following steps
- Divide a piece of white drawing paper 8.5”x11” into four sections
- In each of the four sections create a quick sketch (a form of prototype) of your inversion. These should be radically different approaches. 40 min
- Find a partner in class and have them critique your prototypes. Have a conversation about your work. Make notes on your drawings to record their feedback. Switch roles and repeat the process. 15 min
- Select the best of your prototypes and on the OPPOSITE side of the paper create a refined version of your inversion. This final version should be as large as can comfortably on a piece of paper. Try to refine your initial prototype, by incorporating the feedback of your partner. Do your best work. 15min
- Take a total of 3 photos (1 of your prototypes, 2 of your final inversion from BOTH perspectives)
- Upload ALL 3 photos into your MY MEDIA STUDIO folder and then insert them into your e- portfolio under the Inversion heading (Project. 10 min.)
- Under your photographs write a short reflection.
Please answer in complete sentences and use the following questions to guide you:
Written Reflection:
- Was it easy for you to develop four prototypes –why or why not?
- Describe the experience of having someone critique your work was it useful – how did it make you feel?
- Describe the evolution of your inversion from its original prototype to its final form – how did it change?
- If you were to continue to refine your inversion to make it even better, what would you do next?
- Overall how did you feel about this design challenge - did you find value in it – would you recommend that we keep it in the unit?
Project #2: (2 class periods)
Design Scavenger Hunt: 2 Class Periods
Design is all around you.
There are many types of design as seen in the video above.
In this assignment you are to use your iPad and search the campus for examples of the types of "design" listed below.
Get out of the classroom and explore different areas of the campus.
- Architectural Design
- Automotive Design
- Communication Design
- Engineering Design
- Environmental Design
- Fashion Design
- Furniture Design
- Game Design
- Graphic Design
- Interior Design
- Landscape Design
- Packaging Design
- Product Design
- Software Design
- Web Design
Once you have gathered all of your images you will need to upload your images to your online portfolio. Images should be put into a gallery (with image and description / definition of "Type of Design).
Submit your work (URL) through OnCampus.
How to post your work in the e-portfolio and submit it for grading through the onCampus assignment portal
- Make sure you are in EDIT mode.
- Copy the image of your choice from the gallery.
- Post it in your e-portfolio under the proper heading: Unit 1 - Activity 1 -Form, Content and Subject .
- Directly underneath the image post your statement.
- Switch to VIEW mode. Then click "Open Link" ( top right corner of page).
- Copy the URL from this page.
- Open your onCampus assignment portal.
- Paste the URL into the Box on the upper right. DO NOT ATTACH AS A FILE!
The following list represents ALL of the required work for Unit 1:
-
Marshmallow Challenge - At least 1 Photo and a Written Reflection
-
Inversion Design - 3 photos (1 of your prototypes, 2 of your final inversion) and a Written Reflection.
-
Design Scavenger Hunt
Important:
ALL of your work must be posted in the appropriate UNIT with correct heading in your ePortfolio.
Share your ePortfolio Link.
To do this you must make sure your portfolio is in "view mode" then copy the URL and paste it with your name in the Google Doc. Found in "Student Webites" to the Right --->
