 Burr and Burton Academy
GRAPHIC DESIGN
Burr and Burton Academy
GRAPHIC DESIGN
Logo Design
Section 1
These next assignments are walk through assignments.
Choose 2 of the 6 projects to work on.
You will also do the last Logo Project.
There is both a video and written option for the snowboard project. The written walkthrough has some better results.
The Snowboard project is the most involved project but does produce a cool finished product and you learn several tools while doing it.
Open the link for each project and follow along with the steps to create the designs.
Make sure you read all instructions for each project and all expectations for things to post on your portfolio.
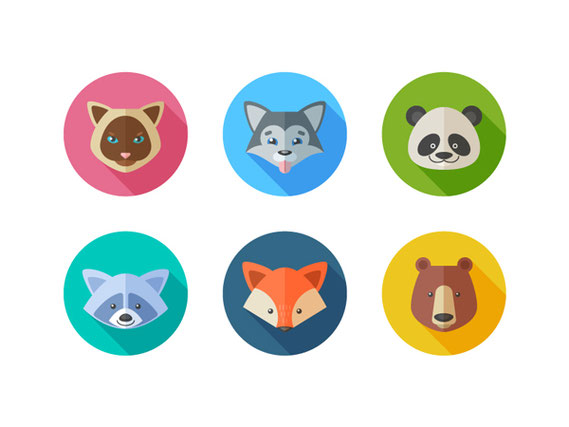
Project 1 - Flat Animals (3 class periods)
In this tutorial we’ll create different animal portraits from one and the same circle! Let’s have fun making a set of trendy flat elements using basic shapes, the Shape Builder Tool, the Pathfinder panel and some other useful functions of Adobe Illustrator!
You only need to create one (1) of the animals.
Project 2 - Retro Badge (2 class periods)
Tutorial
The lesson can be found in Drive in the "Retro Badge
lesson" folder.
Video Version Tutorial
Or try this option (good for second year students) Badge #2
Tutorial
This lesson is to help you learn about shapes, text, texture and alignment.
Also it will help you learn about moving artwork between two programs (Illustrator and photoshop).
Follow all the steps of the PDF. When you get to the add texture section see Mr. Vincent to help with transferring your artwork to Photoshop.
Once done export your design as a JPEG and post your design to your portfolio with a reflection about the process and tools used for the assignment.
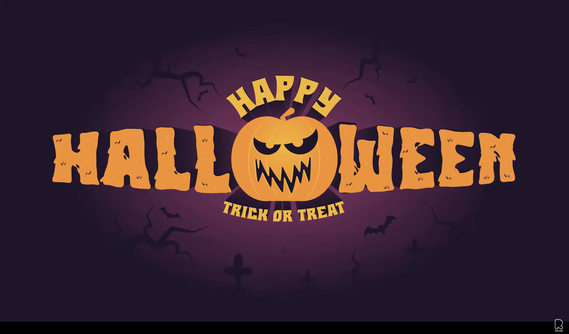
Project 3 - Halloween Scene (2 class periods)
You will be creating a spooky Halloween vector scene that features a creepy pumpkin, trees, and bat silhouettes. We'll start by setting up our document and creating the basic elements of the scene. Then, we'll use a variety of vector tools and techniques to add detail and depth to the illustration, including gradient fills, texture overlays, and shading effects. You'll learn how to create a spooky and eerie atmosphere by using color and lighting effects to set the mood. We'll also explore how to create silhouettes of trees and bats to give the scene a mysterious feel. By the end of the tutorial, you'll have a high-quality Halloween vector illustration that you can use for a variety of projects, from social media graphics to posters and flyers. -RichGfx
Project 4 - Image Trace (2 class periods)
Image Trace
Follow the link to the instructions on how to use the live trace actions to isolate or create a "stamp" like image from a photograph.
When looking for the image for your project make sure that you are using a high resolution image and that the background of the image is not busy or dark. The example that is given shows a light colored background that can be easily separated from the main subject.
This process can be helpful later on with other assignments.
Once complete, export your work as a JPEG and post to your portfolio with description of the process and tools used.
Project 5 - 3D Sushi (2 Class Periods)
This project is a bit different from the other four. It will walk you through the process of creating basic shapes and then will introduce you to the 3D processing abilities that Adobe Illustrator has.
Once you have created the Sushi try playing around with random shapes to see what the effect will have on them.
Post the final result of your Sushi onto your website.

Project 6 - Snowboard (4 class periods)
Snowboard Design
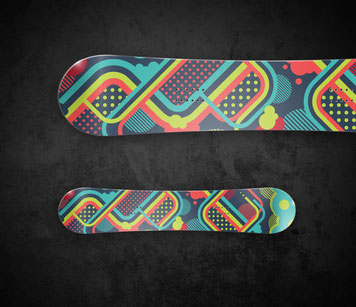
Create a colorful snowboard design by following the tutorial below.
This will teach you how to create your own brushes and patters that will be very helpful in the projects that follow.
You do not have to use the specific colors they suggest. Make it your own.
In my opinion the written instructions produce the better final results than the video tutorial
Snowboard Tutorial: Video Version Tutorial
After you are done with the design of your snowboard, download the link below to "Cut" the shape of your board to the necessary shape.
Save your artwork as "Snowboard Art".
You will need to group all of your artwork before cutting your shape.
Open the link in Illustrator. Copy the line drawing and paste it into your artwork art board. You will have to resize the board outline to the size of your artwork and place it on top of your work.
Once the outline is on top of your art hold shift and select your artwork. (both the outline and our art will be selected).
Hold down the command key on your keyboard and press the number 7. This should crop all of the work to fit the shape of the snowboard.
Caution: Before saving make sure you rename the artwork as "Snowboard Crop" or it will overwrite the original!
Export both the artwork and the cropped work as PNGs and post on your portfolio with a reflection about the process and tools used.
|
Project Description: A) Describe the challenges you experienced maintaining a proper MINDSET while working on this project. i.e., Curiosity, time management, impulse management, persistence & preparation, ability to collaborate Mindset- 1. What were your challenges and why? 2. What strategies could you use to improve? B) Describe your ability to explore creative solutions while working on this project using your THINKING SKILLS. I.e., Ability to understand the expectations of the project, ability to find information to solve the challenges presented, ability to derive multiple solutions, ability to verify and test your work, ability to self reflect on your progress. Thinking Skills: 1. What were your challenges and why? 2. What strategies could you use to improve? C) Describe your ability to improve upon your content knowledge and skills during this project. EXPERTISE DEVELOPMENT I.e., Ability to expand on prior knowledge, use appropriate materials, develop new technical skills and procedures and understand how the work of the project can improve your overall performance and understanding. Expertise Development: 1. What were your challenges and why? 2. What strategies could you use to improve? |
Section 2
Business Logo Design - See Mr. V For Design Packet
Read this Logo Design Rules article.
***12 Essential Rules
Also take a look at these business logo design processes. They can be very helpful for your Design Thinking Process!
No Logo has ever been created the first time it was drawn!
You as Designers need to take pride in the work you are doing and refine, refine, refine until you produce the best work possible.
Take a look at the revision sample for the Metro Aviation Logo by:Chuck Green

Project- 3 (8 Class Periods)
You are to design a logo for a fictional company, non-profit organization, product or event of your choosing.
The process of the logo design is just as important as the final design itself.
See Mr. Vincent for Design Packet.
Step 1
Target market
You can begin by researching demographics to focus on age group, income levels and geographic location.
But it isn’t all about the demographic. In Graphic Design, your graphics can appeal to different consumers based on their
personal interests or hobbies. So, you’ll want to ask yourself:
- What are their hobbies?
- How do they spend their time when they aren’t going to school or working?
- What are they interested in? Sports, music, movies?
- What products do they buy?
- What interests them?
Try to put yourself in the shoes of your target audience. Think about what would catch your eye if you were this individual. What colors, pictures or designs would you respond to.
It is very important to plan where your design is going to be appear (correspondence, presentation, retail, signage, broadcast, print advertising, packaging, internet or more?)
Does it need to translate Across Cultures and Languages?
Step 2
Type of Business, who are you designing for?
Non-profit organization, for-profit business, specific product or event.
What are the differences?
Step 3
Planning for your logo.
1. You will design a logo for a fictitious for-profit business, non-profit organization, specific product or event.
2. Create a name for the entity.
3. Describe what this entity does. Be clear because nobody has ever heard of them before.
4. Clearly describe their target market. Include information on their gender, age, lifestyle and socio-economic status.
If you are having a difficult time coming up with a name for your company you can use this site. Name Generator or any other name generator. Choose a few names to work with and think about how they will be used throughout the entire process.
USE THIS DESIGN BRIEF TO HELP WITH IDEA PLANNING
Step 4
Brainstorming
List as many things that relate to the entity as possible. There are no wrong answers at this point. Brainstorm! Use the internet. Ask friends. Ask your parents. The more you come up with, the easier the next step will be!
Step 5
Thumbnail sketches
Thumbnail sketches are small (thus the name 'thumbnail') and quick. The emphasis is on the logo CONCEPT as opposed to the drawing ability. CONCEPT, CONCEPT, CONCEPT!
Remember to keep your concepts SIMPLE! Text is a vital element of a logo design so don't forget about it.
Remember the professional techniques that you clipped out of magazines: reversal, attach to path, comstock (offset path), hard shadow, replace type with image, type modification, & type contrast.
Extra credit will be awarded for generating more thumbnails than are required.
Step 6
Rough Sketches
Narrow down your thumbnail sketches to the 2 concepts with the most potential. You will be working on these 2 concepts exclusively from now on. Choose concepts that are creative and follow the rules of effective logo design.
Use a pencil to refine these concepts so that they clearly communicate your concept to your client. Drawings don't need to be perfect, but they do need to account for placement, proportions and clarity.
Imagery is not a requirement, but if you choose to use imagery then make sure that you can create it yourself using Illustrator.
Show all your sketches to Mr. Vincent before moving on to the next step.
Step 7
Digital rough sketches
Use your Illustrator skills to create digital versions of your 2 rough sketch concepts. Explore fonts. Carefully consider text size and placement.
Design in black and white for now.
Explore further versions of one of your concepts? This is VERY real world. Try different configurations, layouts, reversals, etc. Keep the concept the same, but experiment with alternate versions. Usually, you'll stumble upon an even better design.
Try different color backgrounds, invert the colors, light on dark - dark on light.
Step 8
Finalize the logo.
This is the place to fine tune it. Attention to detail is key. Nail down exact colors. The final logo is a 2 or 3 color design...not 1 color, not 4 colors.
List to color mixes used for your design with your work.
Layout and placement very important because this is the logo that is locked. It won't ever change.
Step 9
Design Mockup
Place your design in a mockup situation using a Photoshop mockup. Think about where you would expect to see your logo in real life; On a hat, on a sign, bus stop, coffee mug, office window, etc.
Company/Organization Info: Briefly explain who this company, organization or event is. Who is their target market? You have ALREADY DONE THIS! Refer back to step 3.
Concept Brief: Briefly explain the overall concept of your logo. Explain WHY you designed the logo concept the way you did. You can probably just copy/paste most of what you wrote for your rough concept.
Print out final design on Art Color HP attach to packet and hand in to Mr. Vincent.
Upload all digital files to your portfolio in order with notation to each step of the process.
Get your Candy and celebrate your hard work.
“I strive for two things in design: simplicity and
clarity. Great design is born of those two things.” - Lindon Leader