 Burr and Burton Academy
GRAPHIC DESIGN
Burr and Burton Academy
GRAPHIC DESIGN
Group Project
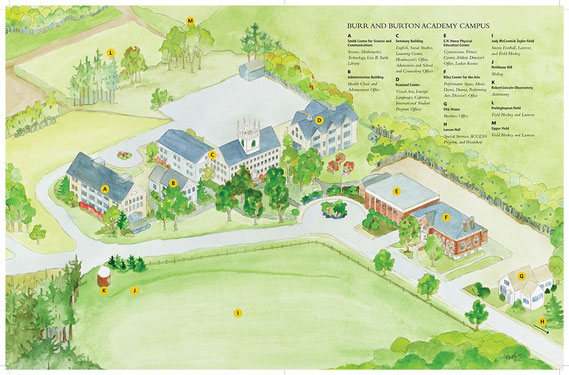
Map of Burr and Burton Academy
Using some of the same concept of the assignment above with the creation of symbols it is your job to create a map of the Burr and Burton Academy campus.
(I know that there is already a basic campus map that is given to students at the beginning of the year. Is it up to date and is it available to all who visit the school?)
Think about how someone who has never been to our school would feel about the task of moving around our school. How could you direct them around with only a one or two sided map? The map should be the size of a 8.5x11 piece of paper.
Do some research of how other institutions have done this. Look at school, airports, malls, towns etc.
Use your sketchbook to write down you ideas. Sketch out any and all ideas for symbols that might be used on your map.
Can the map be color coded, broken into sections?
Another way to think of this could be like a kiosk, a place that people could stand in front of to see the campus map.
If you go this direction think about where it should be located on campus. The kiosk size should be reasonable, think about how it would interact with the campus environment.
This is a large task.
Use all your resources to help you. Ask people at school, students freshmen, faculty, parents, anyone who has access to our school. Were they comfortable walking around campus for the first time?
Logo and Branding
(Project: BBA Agricultural Program at Dene Farm and Greenhouse)
BBA - Dene Farm
BBA at Dene Farm
any variation there of
Objective:
To design a logo for a department, group or club.
Working collaboratively with client to build a logo and branding book.
This is a large undertaking and will take several stages to complete.
As designers it is your task to create a new logo and brand for this client.
Since you will be working as a group things will need to be organized and work will need to be shared amongst the group. Once all the information has been established it would be wise to split the groups responsibilities to make the project work more productive.
You will all be graded for the work you contribute. This will be shared out with the teacher and with the client.
- Firstly the design Brief must be created. Creative Brief
- Meeting with the client to gather all of their information that will help you with your design. Fill out the Design Brief provided prior to meeting with the client.
- We will all meet with them at the same time.
- Write down any and all questions you can think of that would help you. Each of you should have no less than 5 questions to ask.
- Also keeping notes to know what the client is all about. The more detail the better. (perhaps recording the interview).
- After gathering the information from the client you will all sit down and discuss the key facts that you have gathered.
- Narrow down these to the most important for the logo design.
Not only will you be creating a new professional looking logo you will also be creating a
“Brand Book”. This is a 4-6 page book that lays out the key information about the client and the important design components that you will be using to create your logo design.
Some things that should be found in a “Brand Book” are:
Brand book:
Brand Logo - 1 primary (simple and precise), 1 secondary (slightly more embellished for on line use), 1 banner version (can be used for letter head or website banner, 1 icon/ mobil app
Colors - no more than 3 major colors (CMYK and RGB values)
Type faces - 1 Primary and 1 secondary
Look at ALL of the research existing Branding books and styling guides links below for inspiration. Perhaps it would be a good idea to look at others as well.
Ideas and Inspiration:
All work will be shared with the client at certain times during the development of the project. That means we need to stay organized!
There will be three meetings with the client over the development of the project.
- 1st meeting - Gathering of information and design brief
- 2nd meeting - Share out of ideas and receiving client feedback for revisions.
- 3rd meeting - Final design share out with client.
The final project will be presented to the client as a group at the end of the project.
Final project presentation will be in slide show and completed printed Branding Book.
Publication to promote the "ARTs Department" at BBA.
8 pages including cover.
Due:
Two weeks
Project:
Lay out the content of a magazine article in two (or more) text-heavy
magazine spreads (i.e. at least four pages) using Adobe InDesign, Adobe Photoshop and (as needed) Adobe Illustrator.
The subject/content of the magazine spreads is up to you.
Objectives:
•Improve
skills with digital photography (arrangement, working with models, lighting, composition, color, exposure, expressiveness)
2. •Combine
text and image appropriately
3. •Skillfully
use Adobe InDesign to lay out a multiple page document.
4. •Apply
knowledge of effective layout techniques in a text-heavy document.
5. •Employ
the use of a clear visual hierarchy to guide the viewer through a two-page spread.
6. •Apply
an understanding of leading and kerning. Leading and Kerning and tracking
7. •Apply
the the grid system for organizing a multi-page document. The Grid System
8. •Define
and utilize lorem ipsum. Lorem Ipsum
9. •Define
and demonstrate an awareness of the gutter.
Materials:
1. •Digital
cameras
2. •Examples
of magazine spreads
3. •Adobe
InDesign
4. •Adobe
Photoshop
Parameters:
1. •Size:
9" x 12"
2. •Pages:
6
3. •Margins:
.75" all around
4. •Bleed:
.25" all around
Process:
1. Critique professional magazine spreads: What makes a good
spread?
2. Brainstorm ideas for the magazine content and visuals.
3. Select the content and headings for your spread.
4. Draw a series of thumbnails, color schemes and rough drafts of the
spreads.
Plan for visual hierarchy, use of
the grid, gutter, bleed, etc.
5. Decide what your photos need to look like.
6. As a group, help each other take photographs for your magazine
cover.
Fill
roles: photographer, assistant, lighting, model(s)
7. Create a grid in InDesign.
8. Lay out the magazine spread. The two pages on each spread should feel like one,
but you must also pay attention to the gutter so information does not get lost.
9. Incorporate the following elements:
1. •Heading
2. •Standfirst
3. •By-line
4. •Subheads
5. •Body
Copy using Lorem Ipsum (www.lipsum.com) or your own
writing
6. •Pull
Quote
7. •Drop
Cap
8. •Text
Wrap
9. •Captions
10. •Photo
Credit
11. •Sidebar
/ Box-Out
10. In addition to photographs taken by you and your partners, you may use images
that are clearly in the public domain. We will discuss these types of images.
11. Consider appropriate typefaces and type size for each part of your layout. See
the "Typefaces for Layout" page for help.
Grading criteria:
1. •Participation/collaboration
2. •Quality
of photographs
3. •Effective
use of visual hierarchy
4. •Skillful
application of InDesign
5. •Utilization
of design tips - grid, gutter, bleed, leading, kerning, lorem ipsum, etc.
6. •Craftsmanship/
Technical Quality
7. •Work habits